Digitally Sign and Verify Files
You can protect files from tampering by digitally signing them. You digitally
sign a file with a private key then electronically
transmit the file along with a public key to a
recipient. Using the public key the recipient can verify the file to insure it
was not tampered with or corrupted during transmission. This is all possible
using the cryptographic operations contained in Window's Crypto
API functions.
Download Source Code
Means of sending messages in encrypted form are called ciphers.
For example, moving each letter in 'Hello' right 3 places yields 'khoor'.
Moving each letter is the algorithm and the number of places, 3 in this
case, is the key. If you send someone the encrypted message and the key
they can decode the message. Problem is, they need to know your key. This
algorithm is symmetric because the encryption and decryption keys are
the same.
Public key cryptography uses asymmetric algorithms
consisting of a public/private key pair. Encryption is done with your private
key and decryption with the public key. Digital signing uses a key pair and
encrypts the message to be signed with the private key to produce a
signature file. The recipient uses the public key to decrypt the
signature and see that it matches the original file. However, a signature can
be as big as or bigger than the original message. To remedy this, you use a
hashing algorithm to reduce a message of any size to a fixed length
output called the hash.
In general you:
-
Produce a hash of your message.
-
Sign the hash with the private key.
-
Send the signature and the original message to the recipient.
The recipient verifies the message by:
-
Using the public key to decrypt the signature and reveal the original hash.
-
Recalculates the hash from the original message.
-
Compares the two results.
-
If they differ, the file was changed or corrupted.
Generating a Key Pair
-
Use CryptAcquireContext to open the CSP and a key container
-
Use CryptGenKey to create a key pair
-
Export the key pair using CryptExportKey on each key
-
Delete the key pair from the container with CryptDestroyKey
-
Use CryptReleaseContext to close the CSP and key container.
Sign or verify a File
-
Use CryptAcquireContext to open the CSP and your key container
-
Use CryptCreateHash to create a hash object
-
Use CryptHashData to hash your file
-
If you are Signing a file:
-
If you are Verifying a file:
-
Use CryptImportKey to import the public key into the container
-
Use CryptVerifyHash to verify the hash with the public key
Window's Crypto APIs are wrapper functions for Cryptographic
Service Providers (CSPs) which do the real work. A number of CSPs
ship with Windows. The Microsoft Base Cryptographic Provider is used
here. A CSP lets you create a named key container for
working with keys. A key container is a protected area that only the CSP can
access. Your key container should have a unique name so other applications
don't overwrite your keys with theirs. Your app should always use the same key
container every time it runs.
This program uses the CryptAcquireContext API to
open or create a CSP. CryptAcquireContext takes
several parameters (download the source code and see the AcquireCryptoProvider
function). hCryptProv is the handle to the key container named pszContainer.
This key container refers to the name of the CSP - Microsoft Base Cryptographic
Provider v1.0 in this case. The dwProvType variable specifies
the type of services the CSP must provide. A value of RSA_PROV_FULL
is used. A value of CREATE_NEWKEYSET in the dwFlags
parameter says create a new key container while a zero means open the container
specified by pszContainer.
Before you can sign or verify a file you need to generate a public-private key
pair using the CryptGenKey function.
CryptGenKey uses four parameters. hProv is the key container
handle just obtained. Algid denotes the type of algorithm you want to
use. Specify AT_SIGNATURE to create a signature
key pair. dwFlags sets properties for the key pair. Use a value of
CRYPT_EXPORTABLE so you can extract the key pair from the container
and write it to disk. Parameter phKey holds a handle to the newly
created keys. The dwFlags parameter lets you specify the key size in
bits. This program uses a 512 bit key. For added security you can use a 1024
bit key (but you will need to adjust the size of the various structures used).
Once you have a key pair you need to export the keys to arrays using the
CryptExportKey function. You can set the dwBlobtype parameter
to PUBLICKEYBLOB to export the public key or
PRIVATEKEYBLOB to export the private key. Set pbData to point
to a byte array to receive the key data. With a 512 bit key length the public
key is 84 bytes and the private key is 308 bytes. This values is passed in the pdwDatalen
parameter. After the arrays are populated with the keys, they are written to
disk files with .pri and .pub extensions.
Next you need to hash your message to a fixed length output. A call to
CryptCreateHash passing in the handle to your key container is the
first step. CryptCreateHash's Algid parameter indicates the type of
hashing algorithm to use. Set this to CALG_MD5.
The pHash output parameter returns the handle to the hash object.
You use the CryptHashData function to hash the
message. Since your message may be large, you can call CryptHashData multiple
times with successive chunks of the file to be hashed. This program uses 512
byte chunks. CryptHashData's hHash parameter is the handle to your hash
object, pbdata is an array containing the current chunk to hash, and dwDataLen
is the length of the chunk.
After hashing, you pass the handle of your hash object into the signing or
verification functions. First, though, you need to open your key container with
CryptAcquireContext. Next import the private key you want to sign the file
with. Do this by creating a variable of type T_EXP_PRIVATEBLOB
and read the private key data from the .pri file into the byte array
contained in this type. Call CryptImportKey to
move the key into the container.
CryptImportKey has an hProv parameter which is the key container handle. pbData
is the variable holding the key data and dwDataLen is the length of the
data. This function sets phkey to the newly created handle of the
imported key. Now, prepare a buffer to receive the signature data. Use a byte
array of 64 bytes (if you used the 512 bit key size). Sign your hash with a
call to CryptSignHash.
CryptSignHash takes the handle to the hash object
in its hHash parameter. Pass AT_SIGNATURE in
dwKeySpec and specify the first element of the signature byte array in pbSignature
with a length of 64 in pdwSigLen. If the function is successful
(returns 0) the byte array is populated with the signature. You can then write
the signature to disk. This program uses a .sgn file extension.
Verifying a file is very similar to signing it. You can see the source code for
details.
Windows 95 OSR2, Windows 98, Windows NT4 or Windows 2000. This also uses the VB6
version of the Common Dialog Control which will not work directly under VB5.
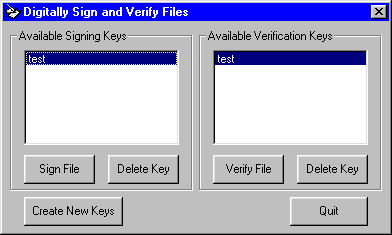
Download the source code. Press F5 to run the program. Select the test key
from the listbox to sign the included SignMe.txt file with and click the Sign
File button. Now select the same key and verify the file.
Now try corrupting the file to see what happens. Again, select the test key
from the listbox and click the Sign File button. This time open
SignMe.txt with notepad, make a change to the file, and save it. Now try
verifying it.
Experiment with creating your own keys and signing/verifying files.
|