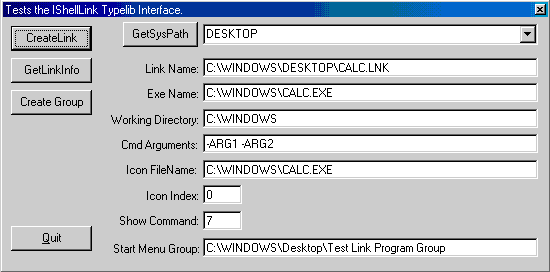
Create Shortcuts (Shell Links) with iShellLnk
Creating shortcuts or obtaining information about existing shortcuts from Visual
Basic is as easy as creating an object, setting a few properties and invoking a
method. The hard part is knowing what object to create an instance of and
what its interface looks like. That is where your Visual Basic CD comes
in. There is an example in the unsupported folder showing you how to use
Explorer's iShellLnk interface. It includes
a type lib file making the iShellLnk interface
available to Visual Basic. The program also illustrates how to determine the
path to special folders such as the desktop, recent documents, recycle bin,....
I rewrote the sample shell link program to make it easier to understand and to
add additional comments. Download the source code to see a detailed description
of how it works.

Download Source Code
Download the source code and press F5 to run the program. Make sure the
file ShellLnk.tlb is in the same folder as this
project or in a folder in the path.
To determine the location of one of the special folders:
-
Select a folder from the dropdown and click the GetSysPath button.
To create a shortcut:
-
Select the folder to create the shortcut in from the dropdown and click the
GetSysPath button.
-
Change the last part of the Link Name to the name of the shortcut file. Ex.
Calc.lnk in this above case.
-
Enter the path of the executable to create the shortcut for in the Exe Name
textbox.
-
Enter a Working Directory.
-
Enter any necessary command line arguements.
-
Specify the path for the .exe to retrieve an icon from. Typically this is the
same as the Exe Name entry.
-
Enter the icon's index in the executable. Generally this is zero. See my
Extract Icon
program for more info.
-
Enter a Show Command value: 3 - Maximized, 5 - Normal, 7 -
Minimized.
-
Click the CreateLink button.
To obtain info on an existing link:
-
Enter the path of the link file in the Link Name textbox. The path information
is available by Right clicking on the shortcut, selecting properties and
examining the Location and MS-DOS name values.
-
Click the GetLinkInfo button.
|

About TheScarms
Sample code
version info
|